No Risk Photograph Restoration -
Free Advice Call 01825 740986

Author Archive for Richard Haines – Page 9

Don’t Risk Losing Your Family History – Preserve It Forever

Shoebox1

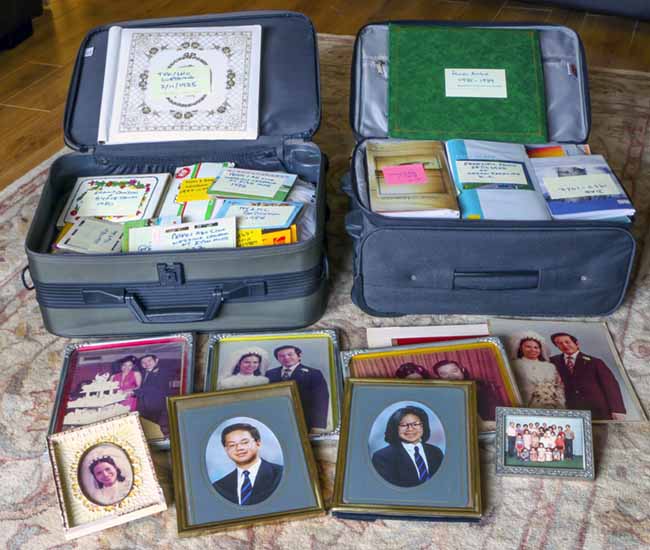
We all have old photographs that we treasure, whether they are old family photographs passed on from previous generations, or historic photographs of the homes and towns we live in.

Photographs are the best tool we have to relive our cherished memories and remember loved ones who are no longer with us. Unfortunately photographs don’t age well and over time their quality diminishes.

Because photos are printed on paper things such as handling, light, moisture, dust, and scratches often affect them. Regrettably, these things can ruin our photos and prevent them from lasting through the generations.

Most of the photo papers and inks used up until recently have not been archival quality, and as a result, many photo prints show signs of fading and colour shifts after only a few years.

Poor storage practices such as keeping photos in attics or basements or allowing photos to be exposed to sunlight, have also contributed to the poor condition of most photo collections.

People don’t realize there is a problem until they take a look at their photo collection after many years of storage. Our precious photo collections are in fact fading away and in time many will be beyond recovery. There is also the possibility of their demise in the case of fire or flood.

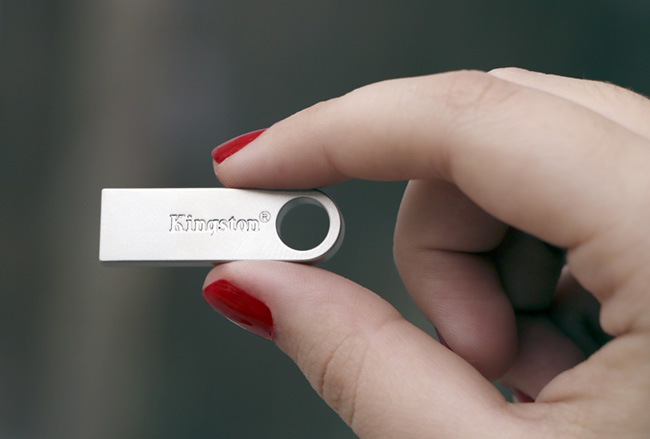
It is a good idea to restore your special photographs or even entire photo collection in order to stop the unavoidable destruction that will take place no matter how carefully the photos are stored. Once restored, the photos can be copied to CD or DVD for long-term storage and safekeeping. Once you have digital copies you needn’t worry about further damage because digital images do not change at all. You can use these digital images to make a set of prints on archival paper, which will last over 100 years in an album with no signs of degradation or twenty years exposed to daylight for framed prints. Additional prints can be made at any time in the future should disaster strike.  You can also share the images with other members of your family and friends.

During the restoration process it is also possible to improve the quality of the original photograph – for example removal of spots, stains, marks, tears as well as improving contrast, brightness, colour balance and enhance detail, focus and sharpness.

It is also possible to add colour to black and white photographs, as well as being able to make quality enlargements for framing.

Organise Your Photographs – It’s Easier Than You Think!


Shoebox1

Are you one of the many people who has hundreds or even thousands of photographs, some in albums, some in boxes, and in more recent years, huge numbers of digital photographs on the computer? The thought of organising all your precious family photographs can seem quite overwhelming although when it’s done there are huge advantages that make the job very worthwhile.

How good would it be to be able to find the photos you want, when you want them, and end the seemingly endless frustrating searches that we’ve all done in the past. More importantly, when your photographs are organised, future generations will have all the benefits of your efforts. They will know who is who, dates, places and any other detail you may be able to add.  Your photograph archive becomes a valuable heirloom.

It’s Easier Than You Think

At first it may seem like a task that is just too enormous to tackle. The good news is that when it’s broken down into simple steps, it’s much easier than you think, is actually great fun and is very rewarding.

  1. Collect together all loose photographs and albums into one place
  2. Sort the photographs into as near chronological order as you can. During this process put aside any duplicates, sub-standard photographs and ones that you don’t like or are irrelevant.
  3. Scan all the remaining photographs to your computer. Use a scan resolution of 300 – 600 dpi so that any future prints made from the scan will be good quality. If you can’t do this yourself I can do this for you.
  4. Create a sub-folder for each year in the My Pictures folder of your computer and put the scanned images into the appropriate year’s folder. Where the year is not known just use your best estimate. To further refine this you can add a sub-folder in each Year folder using the date and subject. For example name the final folder 2013-10-15 Family Party. By using the date format with the year first this makes sorting the folders more logical.
  5.  Picasa is a free program by Google that makes it very easy and straightforward to keep track of all your photographs. It will automatically find all the photographs on your computer and arrange them all in chronological order keeping the names of each folder.     This will include all the digital photographs you already have on your computer.                                                                                             Picasa
  6. Apart from organising your photos you can also enhance them, crop them, and add different effects, although I would suggest you leave any editing until you have the photos organised.  You can download Picasa free from http://picasa.google.co.uk/
  7. You can also title each photograph with further information about the people, places and any other information required.
  8. Tagging your photographs in Picasa is also a useful way to find what you want quickly. A tag is used for a type of photograph, for example ‘Home’. How this could work is that any photograph from any year that features your home could be tagged with the word ‘Home’. Other tags might be ‘Buildings’, ‘Holidays’ or anything else you choose.
  1. Picasa has great search capabilities. If you type in its search field any word relating to the name of a folder, sub-folder, title or tag it will instantly display all those photographs on your screen. Picasa also has a fantastic face recognition feature which work extraordinarily well. It recognises faces even in large group photos, makes a thumbnail image of just the face. You name each different face and it finds all the photographs with that persons face, at any age, and creates a thumbnail of the face against that person’s folder (automatically created). If it doesn’t get it right (rarely) you have the option to correct it. This is a very useful feature in family history projects.

Backing up Your Photographs For Safety

So now you have all your photographs in one place, you have named folders and photographs and they are easy to find.  It’s important that you back them up. This can be done simply by copying the files onto a separate USB external hard drive, CD or memory stick or better still in the cloud on line. Livedrive (see www.livedrive.com)  is an easy inexpensive cloud-based backup service  – a small price to pay for security of all your precious photographs and any other information you need backed up.

Complex Photograph Montage

Here is an interesting order I completed recently. Not only to combine two photographs that were in very poor condition but also to add the woman from the first photograph – minus baby! – to the second photograph while turning her around so she was facing the right way rather than turning her back on her husband!

Montage 650
This was the email I received from my customer…

“Well you’ve done it again, this time with knobs on and I am not referring to the door knob in one the photos! What an absolutely fantastic result. I appreciate the time and effort you must have put in to get the images of individuals in one photo transferred and included in another. The results to include the clean up and restoration are really brilliant, my great grandmother has literally “rejoined” her family – Fantastic. I can’t wait to present the final prints to members of my family.” John P

How To Sort Out Your Photographs

Many of my customers have told me how they’d had difficulty confronting the task of sorting out their photographs which have piled up over the years, so I hope you find this helpful.
I’ve found that once I actually start a job that has been difficult to face, it’s always much easier and quicker that I thought it would be and invariably I actually enjoy the process, getting a good sense of satisfaction when it’s all done.
For example if you like the idea of having modern photo-books that will last forever with no deterioration, no loose photographs falling out and also a book of the family photographs that your relatives can easily have their own copy of then read on…..


It’s easiest to break the project into smaller manageable stages….

  1. Gather all your photographs together into one place
  2. Make a specific time to sit and go through them to separate the worthwhile ones from the not so worthwhile/duplicates/irrelevant ones
  3. Put them into some kind of order – this is not critical as it’s very easy to change the order after scanning
  4. Have the selected photographs digitally scanned – these can be put into separate “folders” if required
  5. After scanning think about captions and or groups for the photos
  6. Work out a suitable order for your photographs to go into the new photo-book
  7. When your photo-book has been put together you will see a ‘virtual book’ on line for checking and approval
  8. Order your photo-book(s) – this can be the relevant size/number of pages to suit the photographs in question.You may find it easier to divide the photos into several smaller books to keep sections separate (dates/places/content)

If there are various family members interested in your project, it is often the case that the overall cost can be shared so each person gets a finished photo-book and the cost of production of the book split several ways.

I hope this is helpful – don’t hesitate to get in touch to discuss any aspect further or if you need any further information – I can help you at every stage.
I can also assure you that the final photo-book will be something that you’ll truly treasure and you’ll be so glad you went to the effort to get it made.

British Empire Exhibition 1925 Photograph Restored

Here is a photograph I was asked to digitally restore.  The original photograph is about a metre and a half wide and the photograph is absolutely fascinating as it contains so much detail. It’s a photograph of Robertson and Ginnetts Gigantic Circus at the British Empire Exhibition in Wembley Stadium in 1925 featuring my customer’s great grandfather who is the ringmaster!
Here is the whole photograph before restoration, after restoration and then a single detail followed by a detail of that detail! There are literally hundreds of recognisable faces.

Clive T Montage 650

Here are some other close-up sections going along the front row from left to right

Detail 1 650 - Copy

Detail 2 650 - Copy

Photographs Forever - British Empire Exhibition 1925

My customer’s Great Grandfather is the ringmaster on the left with the top hat

Detail 4 650

Detail 5 650

Detail 6 650

The following is an extract from Anne Clendinning, “On The British Empire Exhibition, 1924-25″

The British Empire Exhibition, held in 1924 and 1925, assembled the member nations of the empire to develop imperial trade connections and to cultivate closer political ties between Britain and her territories.

The British Empire Exhibition opened for a second season in May 1925, but only after considerable debate. Despite the enthusiastic press reports and the self-congratulatory comments of the exhibition organizers, the 1924 exhibition was a financial disaster. Executive director Sir William Travers Clark blamed the cold, rainy summer. Although 17 million people had passed through the turnstiles, that figure was much lower than the anticipated 30 million visitors that had been the basis for 1924’s projected returns. If only to try and recoup its investment, the British government agreed to re-open Wembley in 1925.

More recently, the British Empire Exhibition appears in the 2010 film about the Duke of York’s stammer wherein Prince Bertie delivers a painful public address at the exhibition’s closing ceremony in October 1925.

There is another interesting article of the British Empire Exhibition here

Dad With His Two Sons Around The Same Age

I was asked to to combine three very low quality photographs so that there was a single photograph of the father with his two sons all around the same age.

I had to increase all the file sizes, restore the photographs, remove backgrounds and the lanyard, match the scale of each person, add Dad’s shoulders, find a different background and then put the composite image together to create the final result. Here’s the before and after.

Creating a Composite Image of Dad with his Two Sonsat About The Same Age

Creating a Composite Image of Dad with his Two Sons at About The Same Age

An Example of Colourising an Old Photograph

Here is the original photograph, then the restored and colourised version. I knew what colour the Union Jacks were – all the rest were my best guess!

Photograph Before Restoration

Photograph Before Restoration


Photograph After Restoration and Colourising

Photograph After Restoration and Colourising

Pet Portraits From Snapshots

Here is an example of a good gift idea – portraits of the family pets.

This example of the history of the family cats, the portraits were made as a gift for the owner from existing snapshots. The scale of the cats’ heads were matched and the busy backgrounds eliminated so that their faces could be seen clearly.

Restored Cat Portraits

Restored Cat Portraits


Family Photobooks Are So Worthwhile

Colette first contacted me in October 2012 and since then I have scanned many of her family photographs. I asked Colette to tell her story…..

“I think it all started with me seeing your advert in a local magazine and being sad at seeing my son Fabrice’s photos, taken in the 1970s, deteriorating rapidly. I had made an album for him for his 30th birthday in Dec 2002. I more or less stuck the original photos in chronological order in the album and wrote a line of text underneath each photo with the date and the place it was taken. Fabrice was absolutely thrilled with that first album. For him, it was like going back to his roots, if you see what I mean. I had the impression of having given him his childhood back and he was very moved that I had spent quite a bit of time making that album.
After I saw your advert, I thought you were the person who could save Fabrice’s photos. I gave you a small job and I was very pleased with the work you did, so I unstuck all the photos which were in Fabrice’s handmade album and gave them to you to scan and optimize in a view to make a new album. You showed me the albums you’d made for your children and I thought they were brilliant.That’s when I thought I had to do the same for my other children, Marianne and Hugo, not just Fabrice. While the work was in progress for the first albums which I gave to my children for Christmas 2014, you gave me plenty of advice and you showed limitless patience as I changed my mind time and time again.

My three children got their second album for Christmas 2015 and to see their reaction when they first look at it is priceless and worth all the efforts. They look at each other’s album and exchange memories and ask each other questions. As a parent, it is really wonderful to see. Albums number 3 are in the pipeline for Christmas 2016, for the three of them as their pictorial history continues.”

Here’s a double page spread of one ofr the the finished photobooks – 29cm x 29cm, 100 pages – a great opportunity to enlarge the best photographs too

29cm x 29cm, 100 page  photobook

29cm x 29cm, 100 page photobook

The Miracle of Digital Storage

Photographs To Be Optimised

4057 Photographs To Be Optimised….

A customer recently brought me the entire collection of his photographs dating from 1945 to 1985.

This turned out to be a total of 4057 photographs that completely filled two large suitcases, with each of the 87 folders carefully labelled.

I scanned, cropped and optimised every photograph and put a digital copy of every photograph before and after optimisation on a 32Gb USB Memory stick.

This created a total of 8114 digital files which all fitted onto the memory stick and incredibly there was remaining space for a further 16,000 digital photograph files!

Kingston 650

32Gb Memory Stick containing 8114 digital photographs and still with enough space for a further 16,000 images. 24, 000 photographs on your key ring can’t be bad!